If you’ve been waiting to start growing your email list, because you can’t decide which program to use, let me answer your internal debate with these 3 MailChimp Hacks.
When new clients come to me, who have just started their business, usually they are debating between two lower-priced services: MailChimp and Aweber. MailChimp starts you out for free, for under 500 subscribers, and upgrades to $10/month after that. Aweber is an equally affordable option at $19/month.
Now, if you can afford Infusionsoft or Ontraport as an initial investment, go for it! You just secured your mailing system for life. But, if you’re like most new coaches who don’t want to shell out their safety net just for emails, then you’re most likely looking at the first two.
But, MailChimp may win your wallet because it starts out letting you try their service for free, but it will win your heart as well with their great service and analytics tools. But, the free version has one very major draw back that most everyone can see – autoresponders are only available for paying customers! So, how are you going to deliver your amazing opt-in offer? That brings me to my first hack, and I’ll show you how.
MailChimp Hack #1: Create a Free Autoresponder
MailChimp is set up to include the double opt-in, meaning your potential customer signs up on your website to get your free report and newsletter, but has to confirm their email address to be added to your list officially. Then, MailChimp sends them an automatic confirmation message. And that is where you can hack in!
Under your list, go to Sign Up forms, and select General Forms. Under the drop down for different form types, select “Confirmation Thank You Page”. Here, you can enter the URL for a page you created on your website, that contains the download link for your opt-in offer. By entering a URL, you can override the basic MailChimp message, and create a fully customized thank you page, that’s branded under your website.
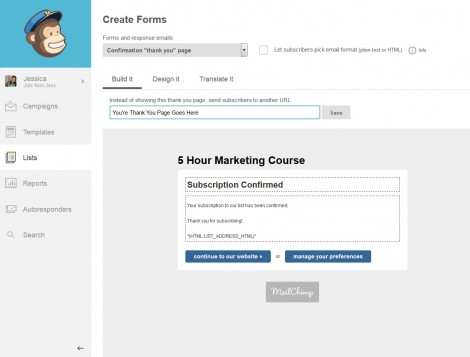 But, if you want to go the extra mile, you can then hack the “Final Welcome Email” sign up email, to include a recap of their free offer, and include a download link as well.
You can also change headlines, colors, etc. for all of these sign up forms, but are limited somewhat in how customized they can be. That’s where the benefit of the paid account comes in, to create a truly customized auto responder email, and follow up series.
MailChimp Hack #2: Create a Custom Facebook Tab Opt-In Offer
So, you’ve already got your hacked autoresponder set up, and that’s great that people can get your free offer and sign up for your newsletter from your website. But what about converting your Facebook fans into email subscribers?
You’ll want to create a custom Facebook tab for that, and I’ve got a great MailChimp hack to show you how.
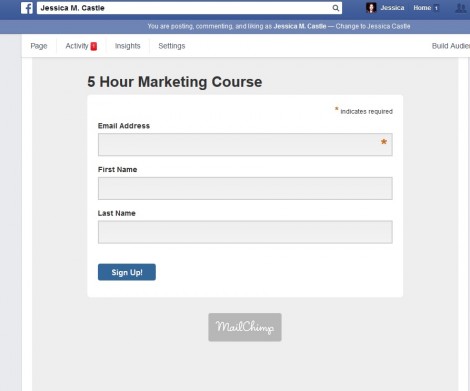
Go back to your sign up form options under your list, and again choose General Forms. Under the “Sign Up Form” option, use the Build It and Design It tabs to create a highly customized, attractive sign up form.
Start with adding a background color, a custom header image, and changing the sign up button color to match your brand colors. Once you have the form filled out with the appropriate fields, colors, and text, click the link that is generated for the form. It should look like: http://eepurl.com/XYZ123.
You’ll see your beautiful, custom form is created right before your eyes! Now, let’s get it on to Facebook so you can start collecting leads from your fan page.
Once you’re logged in as an Admin to your Facebook page, and select the “More” drop down menu and click “Find More Apps” option. This will take you to a search bar, and search for Woobox Custom Tab application.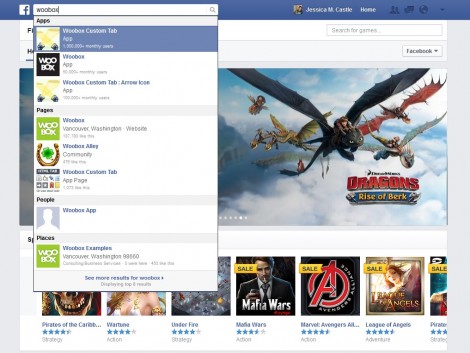 Select it to install it on your page. Once it’s installed, you’ll see the back end of the editor on your page.
Back to the MailChimp sign up form you designed, right click on the page and select “View Page Source”. This lets you see the HTML code that built this page. Copy the code from the <style type=”text/css”> to </html>. You just want to make sure you don’t pick up any script (short for java script) that will interact negatively with Facebook. Then, go back to the tab and and go paste the HTML code in to the Source block.
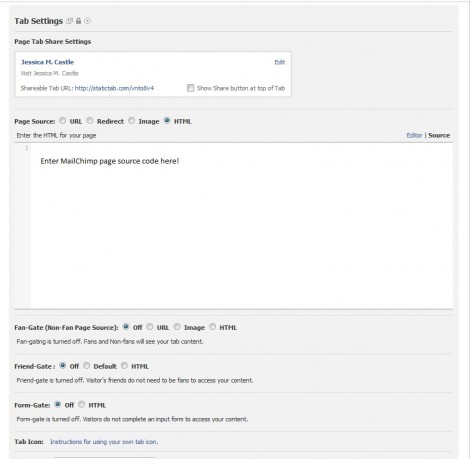 You can then customized the title of the tab under the tab name, add a custom image, turn on fangating (someone has to like your page before they can sign up), and other custom options. Then click save settings!
When you get the notification it was saved, switch from the HTML code view in the source tab, to the Editor view. Just like in WordPress, you can preview the display. You will most likely need to make some changes to the text, but do so via the formatting options in Editor. But, when you click “View Tab”, you’ll see your beautifully embedded MailChimp, lead capture form in your Facebook tab.
If you want to take customization one step further, go back to the Source tab and you can change the text on the button from “Subscribe”, to “Get it!” or “Sign up!” or anything else you choose.
MailChimp Hack #3: Create a Free CRM Account Using Segments and Groups
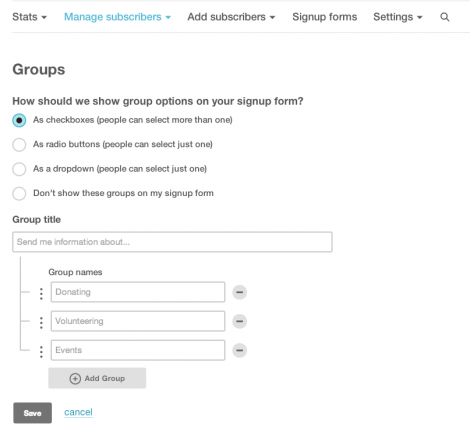
In MailChimp, you create Lists to set up mailing campaigns, sign up forms, etc. And you can create an unlimited amount of lists with a free MailChimp account, but why stop there? You can use groups to create form fields right when your subscriber signs up to find out more about their interests, how often they want to hear from you, etc. You can then send emails that are just targeted at that group if you’re promoting a specific program, like a detox, and they expressed interest in learning more about detoxes.
You can also organize each list with segments. Segments work great when you want to section out members of your list who have purchased a product or program, have a certain career field, or live in a specific location. These are fields that you add in manually, once you know more about your subscriber.
If you want to find out more about how to use groups and segments for your lists, check out this great walk-through from MailChimp.
There are many other great reasons to use MailChimp, such as it’s easy Paypal integration, one-click social sharing, and easy to understand analytics. But, these three MailChimp hacks will keep you from having to spend any money to upgrade your account, until you are over 500 subscribers.



Hi Jessica. Great to stumble upon you.
Love this article title. Maybe a bit more on the money saving part – which it sounds like mainly about how to make the most of the basic plan before upgrading.
Can you set up unlimited or a lot of auto responders with MailChimp basic/started plan?
Kenn
Hey Kenn,
You can only sneak in the one (or two) free autoresponders per list you create. If you’re looking to create a series, definitely look at upgrading. For just $10/month, you can send an unlimited number or autoresponders to a list of up to 500 people. I’m using that plan level myself, for now. The paid version also sends your emails at “suggested” times to increase your open rate.
Ok. Thanks for the detail. Nice name, “mail chimp” and nice free entry-level service to get going. I use AWeber, great, simple interface inside, “eh” name. ;P
Great info, Jessica! I’m still figuring out all of the Mailchimp features and they just updated to offer new options which look amazing too!
Thanks :0
Definitely, the updated automation in MailChimp is my new favorite thing! Glad you found the article helpful.